SewalongwithKitty Tote Bag
Tote Bag- Money Bag
Taking you through the steps so you can make one too. Any fabric will do. This was just a small piece I had laying there. You can make your bags larger or smaller.

You can put a zipper in the top so it zips close. I will take you through the steps of that at another time. I am just going to post some simple things to get you rolling. I love my tote bags. On these two, I only have one strap which is adjustable with D-rings.


I love the vinyl lined because you can just wipe them out and then fill them with something different.

I have a funny piece of fabric I got at
GStreetfabrics it is about 5/8 of a yard. or around 22 inches... by 54. So it is enough to cut in half and use to make two tote bags... sew, I did.
I also had a piece of neutral soft viny here--also around 5/8 of a yard... I had a couple of zippers.
7 or 9 inches for the inside pouch.
I just use what I have on hand... the size of the zipper made the size of the inside zipper pouch..
Or you can recycle old purse zippers.

You can put one on both sides if you want or put it on the outside of the fabric front before you do the step where you sew the sides of the front of the tote. That step would be before step 3.
Steps
1. Get your fabrics together. The outside will be slightly shorter than the Vinyl inside so you can put one inside the other and put it over the top and have a nice border top. 3/4 of yard of soft vinyl and 5/8 of a yard of the front fabric.


3. Fold your fabric pieces right side together and sew the side seams. Your outside piece in this case the vinyl is taller than the outside design piece. you will have a fold on the bottom instead of a seam. They should be exactly the same size except the one is taller .


5. Now you are going to fold the bottom corner so there is a triangle with the seam through it.

6. When you fold the bottom edges and stitch across then trim and the bottom will become squared off. You can insert a large cardboard for your bottom to be flat or I like mine just plain then when nothing is in them I can fold them away into each other.

Trimming any bulky seams is important to give your tote a smooth clean cut appearance. When you turn the bag and the bag lining inside out you will see the squared bottoms. Again, make them the same size triangle so the bags become the same size.
7.


9. Sew the tab so there is 3/8 of an inch uneven when you fold the tab over.. Then topstitch the edges of the tab so the tab is through one D ring. This will be the D ring that the strapping will go through. The other end of the strap will be top stitched onto the vinyl border.
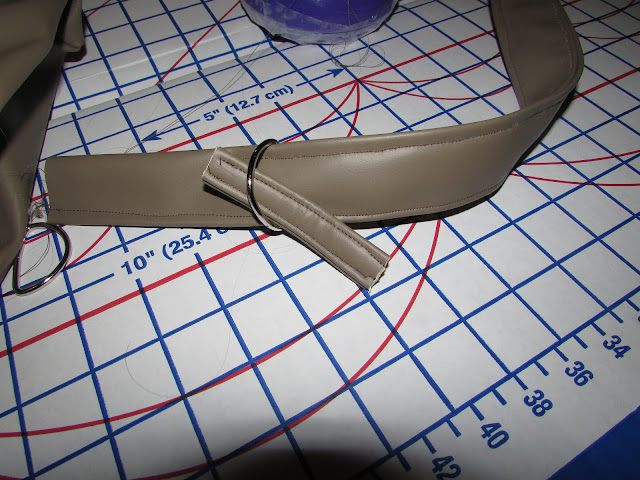
10. Sew the tab onto the seam space on one side of the bag. Slide 2 D rings onto the strap so they are in the middle but loose next to each other. Sew the end of the strap onto the opposite side where the seam is and just sew a square across the end of the strapping so it is strong and firm.
11. Sew the loose end of the strapping accross in a triangle and trim so it is pointy where it is being slipped through the two D rings and folded back through one of the D rings so it has tight leverage. Done!


AND THEN there were TWO!!!
Now you can improvise on that and you can make any tote bag.
There are more tote ideas on https://www.sewtotes.com/
The store where most of my fabric comes from:
Gstreetfabrics.com
I will slowly put more instructional sections to this blog to help you feel more comfortable with trying new things...
The next section will be on simple pillows
SewingwithKitty.com put whatever you are looking for in the keyword box up top i.e. coats, pants, jackets, scarves... or whatever

Comments
Post a Comment