Meetup 8 Two different shirt Styles
Making Fitted blouse style in Multiples

Get out your Hams (sleeve ham and body ham) and your Iron and mat or wool pressing pad.
Pressing is important for cotton shirts.
These lady fabrics are Cotton Lawn and Stretch cotton shirting.
The pattern is a body curve which is what my mother likes.

You are best equiped with a pressing cloth and iron.

This is a comfortable flattering style, but it does have a lot of pieces. You will need interfacing for the Button tab and the collar and cuffs if you are doing long sleeves.

This is what I use (ShirTailor) on my collars, because it makes the points of the collars crisp and sharp. I use regular fusible feather or midweight pellon for the cuffs and button tab.
The blouse fabrics, I pin together and then cut out the pattern all at once I have 3 blouses ready to sew.


Blouses cut out and interfacing pieces ready to apply to necessary pieces

First blouse part sewn together and seams finished ready to apply button tab and collar

The interfacing is applied to the collar tab piece and the interfaced side is ironed under and trimmed to 1/4 inch. the other side of the collar tab is not interfaced. I applied the interfaced side of the tab to the collar piece side that is NOT interfaced. When sewn on the tab will be on the inside of the neck the collar will fold out and be showing the right side or uninterfaced side.

It will fold down like this when sewn on and then I topstitched. Sometimes I hand stitch it on the inside.

I used a random stitch to finish the seams on this one as it is cotton-I folded the edges to the inside and then stitched so there are no raw edges facing out.

I finished the seams on the inside because of being cotton they will fray. The button tab is interfaced and I pinned it on to show you how it is. I used featherweight interfacing which makes it light enough to fold over and double the light stiffness so it is firm but soft for buttons and buttonholes. I did this on both sides.


This is now sewn onto the top of the blouse matching the notches and folding it in to topstitch the edge of the tab inside and the blouse is done except for the hem and buttons.

The pink one is the worn out shirt that fits and the others are compared at this stage to be sure they will come out to the same size.

This is how I mark my sleeves. I clip in to the dots, the top seam has a dot to match to, the dots on the sleeve on front and back match the dot on the shirt pieces and of course, your notches match. I sew the sleeve seam and the match the dots and the notches and sew the sleeve in. Some people do a basting stitch so they can pull it a little if they cant get the extra curve to ease in when sewing.
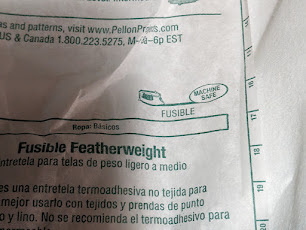
This is the fusible interfacing I am using for the button tab piece and the neck tab.


Trim the seam to quarter inch and clip the corners, so they will be pointed without bulk in the corners
The interfacing is going to be on the underside of the collar.

Pay attention to which is the top side and which is the underside that is interfaced when you are pinning it onto the neck tab.
The neck tab will be opposite, because when you add the button and buttonhole that will be on the right side so the right side will be out and the interfaced side will be inside your shirt.

You sew the collar tab to the collar and then the side with the interfacing has been ironed in and trimmed. You sew the untrimmed side to the top of your shirt and then fold in the pressed edge and either top stitch or hand stitch to the inside of your shirt top edge.

I sew the button tab on the shirt, then the collar tab on the collar and then sew the neck tab to the top of the shirt.

The sleeves are already on, so then the shirt is finished, except for buttonholes.


The shirt fabrics I do the same and I have 3 shirts ready to sew. The mens shirts are no body curves and no button tabs, so there are less pieces and less interfacing and faster sewing.


My brothers will be the old cars and the other two are for my son. I also have a 4th that is skateboards.

Comments
Post a Comment